There’s nothing quite as frustrating as craving a cold drink on a warm day, only to find your trusty countertop ice maker stubbornly refusing to produce any ice. These compact, convenient appliances are a staple in many homes, providing a constant supply of ice without the need for freezer space. However, like any appliance, they can encounter issues, with the most common complaint being a failure to freeze water into ice. This comprehensive guide will walk you through the essential troubleshooting steps, helping you diagnose and resolve why your countertop ice maker might not be freezing, ensuring you can get back to enjoying perfectly chilled beverages.
Understanding Why Your Countertop Ice Maker Stops Freezing
Before diving into fixes, it’s crucial to understand the common culprits behind an ice maker’s inability to freeze. Identifying the root cause can save you time and effort in the long run, allowing for a more targeted repair approach.
Water Supply and Flow Issues
|
Our Picks for the Best Ice Maker in 2026
As an Amazon Associate I earn from qualifying purchases.
|
||
| Num | Product | Action |
|---|---|---|
| 1 | ETL Approval Clear Ice Cube Maker Countertop, 3 Crystal 1.6" Clear Ice Cube in 10-20Mins, Slow-Melting & Adjustable Ice Thickness, Ice Makers Countertop with Self-Cleaning for Kitchens/Home/Office |

|
| 2 | Silonn Nugget Ice Maker Countertop, Pebble Ice Maker with Soft Chewable Ice, One-Click Operation Ice Machine with Self-Cleaning, 33lbs/24H for Home,Kitchen,Office |
|
| 3 | Frigidaire 26 Lbs per Day Portable Compact Maker, Ice Making Machine, Stainless, Medium |
|
| 4 | EUHOMY Countertop Ice Maker Machine with Handle, 26lbs in 24Hrs, 9 Ice Cubes Ready in 6 Mins, Auto-Cleaning Portable Ice Maker with Basket and Scoop, for Home/Kitchen/Camping/RV. (Black) |
|
| 5 | Frigidaire Countertop Crunchy Chewable Nugget Ice Maker, Compact, 33lbs per Day, Metallic Finish |
|
| 6 | Nugget Ice Maker Countertop, Silonn Chewable Pellet Ice Machine with Self-Cleanin Function, 33lbs/24H Portable Ice Makers for Home Kitchen Officce, Black |
|
| 7 | FRIGIDAIRE Touchscreen Nugget Ice Maker, Countertop Ice Machine, Sonic Ice Maker with 33 lbs. Capacity, Slate |
|
| 8 | Efficient Countertop Ice Maker |
|
| 9 | Silonn Ice Maker Countertop, Portable Ice Machine with Carry Handle, Self-Cleaning Ice Makers with Basket and Scoop, 9 Cubes in 6 Mins, 26 lbs per Day, Ideal for Home, Kitchen, Camping, RV |
|
| 10 | Typhur Fast Nugget Ice Maker Countertop with Self-Cleaning Pump, 35lbs/24H Crushed Pebble Ice Machine with Pellet Ice, 8 Packs Cleaner, Dual Ice Scoops for Home, Kitchen, Party, RV, Stainless Steel |
|
The most basic requirement for ice production is, of course, water. If your ice maker isn’t freezing, the first place to look is its water supply. Issues can range from a low water level in the reservoir to blockages in the water lines or a malfunctioning water pump. Without a consistent and clean flow of water, the freezing cycle cannot properly initiate or complete. Mineral buildup from hard water can also clog components, restricting water movement and hindering the freezing process.
Refrigeration System Problems
The core of any ice maker is its refrigeration system, which includes components like the compressor, evaporator, and condenser. If any part of this system fails, the appliance won’t be able to reach the necessary low temperatures to freeze water. A common issue is a lack of refrigerant (freon), which can occur due to a leak. A faulty compressor, which is responsible for circulating the refrigerant, will also prevent freezing. Problems with the condenser coils, such as being dirty or having a non-functional fan, can lead to overheating, severely impacting the unit’s cooling efficiency.
Overheating and Ventilation
Countertop ice makers generate heat as part of their refrigeration cycle. To function correctly, this heat needs to be dissipated efficiently. If the appliance is placed in an area with poor ventilation, or if its air vents are blocked, it can overheat. When an ice maker gets too hot, its internal sensors may prevent the freezing cycle from starting or completing to protect the components from damage. This often results in melted ice or water that simply won’t turn solid.
Electrical and Sensor Malfunctions
Modern ice makers are equipped with various electrical components and sensors that monitor the freezing process, water levels, and even ice fullness. A faulty thermostat might incorrectly sense the temperature, preventing the compressor from kicking in. Similarly, a defective water level sensor could stop the machine from drawing water, or a general electrical issue, like a loose connection or a blown fuse, could completely disable the unit’s freezing capabilities.
Step-by-Step Troubleshooting for Your Ice Maker
Don’t despair if your ice maker isn’t freezing! Many common issues can be resolved with a few simple troubleshooting steps. Here’s a comprehensive guide to help you get your machine back in working order.
Initial Checks: The Basics First
Always start with the simplest solutions before moving to more complex diagnostics. Often, the problem is something straightforward that can be quickly remedied.
- Check Water Level: Ensure the water reservoir is filled to the recommended level with clean, fresh water. Many ice makers have a sensor that prevents operation if the water level is too low.
- Power Cycle the Unit: Unplug the ice maker from the wall outlet for at least 10-15 minutes, then plug it back in. This can reset the internal electronics and resolve minor glitches.
- Examine Placement: Is the ice maker placed in a well-ventilated area? Ensure there’s enough clearance around the unit (typically 4-6 inches) for proper airflow. Avoid direct sunlight or proximity to heat-generating appliances.
Cleaning and Descaling: A Clear Path to Ice
Mineral buildup and grime are common enemies of ice makers. Regular cleaning and descaling are vital for optimal performance.
- Clean the Water Reservoir: Empty and thoroughly clean the water reservoir with a mild detergent and water, then rinse completely. This removes any slime or mineral deposits.
- Descale the Internal Components: Use an ice maker descaling solution (or a mixture of white vinegar and water, following your manufacturer’s instructions) to run through the unit. This helps dissolve mineral buildup in the water lines, pump, and evaporator.
- Clean the Condenser Coils: Unplug the unit. Locate the condenser coils (usually at the back or bottom). Carefully brush away any dust, dirt, or pet hair that has accumulated on them. A dirty condenser prevents proper heat dissipation, leading to poor cooling.
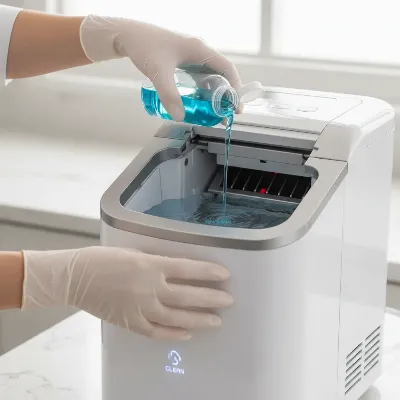 A person cleaning the water reservoir of a countertop ice maker, showing a descaling solution being poured in.
Addressing Water Flow: Pump and Lines
If your unit has power and seems to be attempting to make ice, but no water is reaching the freezing plate, the pump or water lines might be the issue.
- Check the Water Pump: Listen for the sound of the water pump when the unit is turned on. If you don’t hear it, or if it sounds strained, it might be malfunctioning or clogged. Some models allow for basic pump cleaning; consult your manual.
- Inspect Water Lines: Look for any visible clogs or kinks in the internal water lines. While often difficult to access, sometimes a persistent clog can be dislodged with descaling or by gently flushing the system if possible.
Checking Ventilation and Overheating
Proper airflow is crucial for the refrigeration cycle. Overheating is a common reason for underperforming ice makers.
- Feel for Heat: Place your hand near the exhaust vents. If the unit feels excessively hot, it might be overheating. Ensure no objects are blocking the vents.
- Improve Air Circulation: Move the ice maker further from walls or other appliances if it’s in a cramped space. If the fan is accessible and you’re comfortable, check if it’s spinning freely and clear of obstructions.
When to Call a Professional or Consider Replacement
While many common issues can be resolved at home, there are times when professional intervention or even a replacement is the most practical solution. Recognizing these situations can save you further frustration and potential costs.
Identifying Complex Issues
Some problems lie beyond basic troubleshooting, requiring specialized tools and expertise.
- Refrigerant Leak: If your ice maker isn’t cooling at all, and you’ve ruled out other issues, a refrigerant leak is a strong possibility. This requires a certified technician to diagnose and repair, as refrigerants are harmful and complex to handle.
- Compressor Failure: A compressor failure is a major issue that often requires a costly repair, sometimes approaching the price of a new unit. Symptoms include the unit powering on but making no ice, or a buzzing sound without any cooling.
- Major Electrical Malfunctions: If the control panel is unresponsive, or if there are persistent electrical issues despite power cycling, there might be a more significant electrical fault that needs professional diagnosis.
- Persistent Water Pump Failure: After attempting to clean and reset, if the water pump still isn’t circulating water, it may need to be replaced. This can be a complex repair for a home user.
Cost-Benefit Analysis
Before investing in a professional repair, consider the age and initial cost of your countertop ice maker.
- Repair Cost vs. New Unit: Get an estimate for the repair. If the repair cost is more than 50% of the price of a new, comparable ice maker, it’s often more economical to replace the unit. Newer models frequently offer improved efficiency and features.
- Warranty: Check if your ice maker is still under warranty. If so, contact the manufacturer or retailer for service or replacement options.
- DIY Risk: Attempting complex repairs yourself, especially those involving refrigerants or electrical systems, can be dangerous and may void any remaining warranty. It’s often safer and more reliable to consult a professional for these specific issues.
Preventative Maintenance for Optimal Ice Maker Performance
Preventative maintenance is key to extending the life of your countertop ice maker and ensuring a consistent supply of ice. Regular care can help you avoid common freezing issues and keep your machine running efficiently.
Regular Cleaning Regimen
A clean ice maker is a happy ice maker. Incorporate these cleaning steps into your routine.
- Daily Rinse: After each use, or at least every few days, empty any remaining water from the reservoir and give it a quick rinse. This prevents stagnant water from building up.
- Weekly Wipe-Down: Wipe down the exterior and the interior of the reservoir with a damp cloth to remove any spills or residue.
- Monthly Descaling: Depending on your water hardness, aim to descale your ice maker monthly or every other month. Use a food-grade descaling solution or a vinegar solution as per your manufacturer’s guidelines to prevent mineral buildup in the internal components.
- Clean Condenser Coils: At least every 3-6 months, unplug the unit and use a soft brush or vacuum cleaner attachment to clean the condenser coils. Dust and debris on these coils can significantly reduce cooling efficiency and lead to overheating.
Proper Placement and Ventilation
The environment where your ice maker operates plays a critical role in its performance and longevity.
- Optimal Location: Place your ice maker on a sturdy, level surface away from direct sunlight, heat sources (like ovens or dishwashers), and areas with excessive humidity.
- Adequate Airflow: Ensure there is sufficient space around the unit for proper ventilation. Typically, 4-6 inches of clearance on all sides and the top is recommended. Blocked vents can lead to overheating, which directly impacts the unit’s ability to freeze water.
- Stable Temperature: Operate the ice maker in a room with a stable ambient temperature. Extreme heat will force the machine to work harder, reducing its efficiency and lifespan.
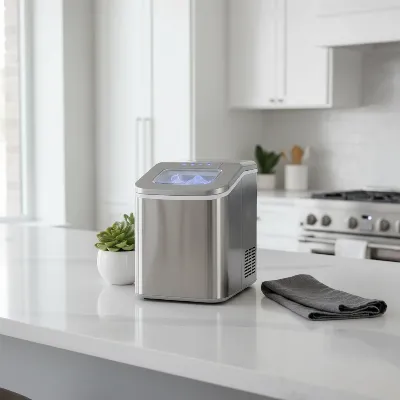 A well-maintained countertop ice maker in a clean kitchen, with emphasis on proper ventilation space.
Using Quality Water
The type of water you use directly affects the cleanliness and efficiency of your ice maker.
- Filtered Water: Whenever possible, use filtered or purified water instead of tap water. Tap water often contains minerals (like calcium and magnesium) that lead to limescale buildup, clogging components and impacting ice quality.
- Avoid Flavored Liquids: Never use flavored beverages or anything other than plain water in your ice maker. These can leave sticky residues, damage internal components, and contaminate future ice batches.
“A small investment in regular cleaning and using good quality water can save you from a major headache and the expense of replacing your ice maker down the line.” – Sarah M., Appliance Repair Technician
Conclusion
A malfunctioning countertop ice maker that won’t freeze can disrupt your daily routine, but with a systematic approach, many issues are easily resolved. By understanding the common causes, such as water supply problems, refrigeration system faults, and overheating, you can effectively troubleshoot your appliance. Simple steps like checking water levels, performing regular cleaning and descaling, ensuring proper ventilation, and power cycling can often bring your ice maker back to life. However, for more complex issues involving refrigerant leaks or compressor failures, it’s wise to consider professional help or even a replacement. Prioritizing preventative maintenance, including consistent cleaning and using filtered water, will significantly extend your ice maker’s lifespan and ensure you always have fresh ice readily available. So, what steps will you take today to ensure your ice maker keeps those drinks perfectly chilled?
Frequently Asked Questions
Why is my portable ice maker turning on but not making ice?
If your portable ice maker turns on but produces no ice, first check the water reservoir’s level and ensure it’s filled. Then, power cycle the unit by unplugging it for 15 minutes to reset the system. If still no ice, the water pump might be clogged or faulty, or there could be an issue with the refrigeration system such as low refrigerant or a compressor problem, which often requires professional assessment.
How often should I clean my countertop ice maker to prevent freezing issues?
It is recommended to clean your countertop ice maker regularly to prevent freezing issues. A quick rinse of the water reservoir daily and a wipe-down weekly are good practices. For descaling, aim for a monthly routine, especially if you have hard water, and clean the condenser coils every 3-6 months to ensure optimal heat dissipation and prevent overheating.